Build an American Sign Language alphabet classifier using pytorch and GPU environments on Watson Studio
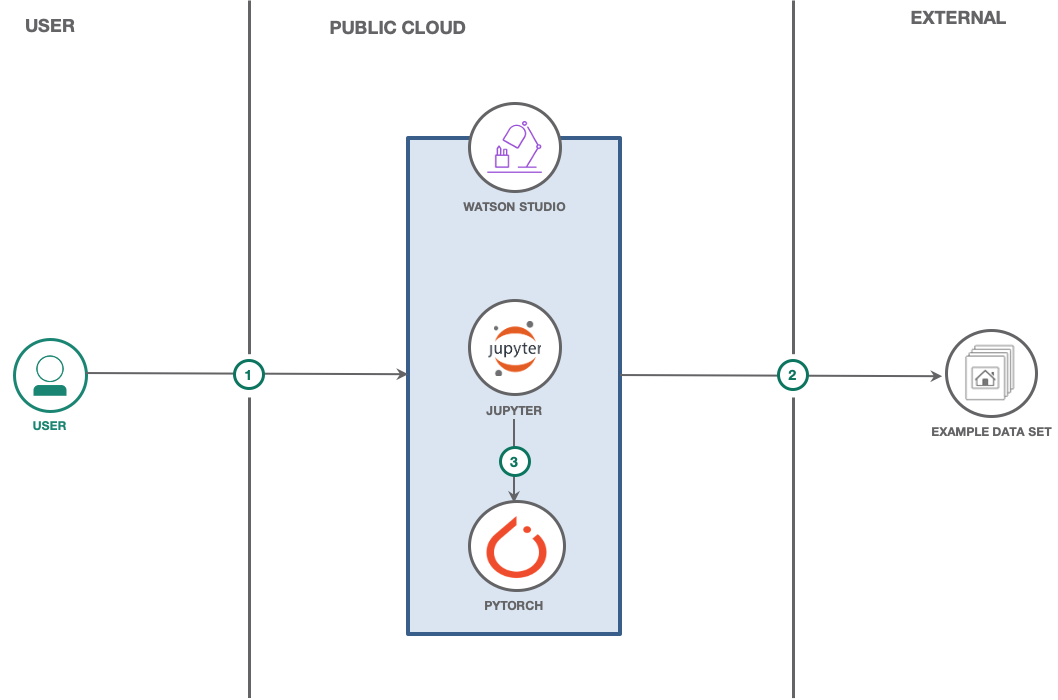
we will use PyTorch to build and train a deep learning model to classify images to 29 classes (26 ASL alphabet, space, Del, and nothing) which can be used later to help Deaf peope communicate with other and maybe with computers as well. We will use a pre-trained mobile network and we will define our classifier and connect it to network, then train this classifier along with some of the last blocks of the network on our dataset.
In this notebook we will:
1- Obtain dataset from Kaggle.
2- explore data and define transformers to preprocess images before training.
3- define our classifier to have an output layer of 29 outputs.
4- train the last blocks of the network along with the classifier we defined.
5- test the model we trained.
This notebook uses python 3.6 + GPU environment which allow us to do the whole process and train complex model in the same place which is a notebook in Watson studio. Learn more about available environments Watson Studio environments.
- Log into IBM Watson Studio.
- Get your Kaggle API credentials
- Run the Jupyter Notebook in Watson Studio.
We will use Watson studio to run this notebook, Watson studio is available through IBM cloud or IBM Cloud Paks For Data.
- To start you must have IBM cloud account, Get your for free Here.
- From the catalog create a watson studio with standard plan or more and make sure the region is dallas to enable GPU environment.
- Alternatively, you can use the
ASL_PyTorch-CPUNotebook if you are a Watson Studio Lite Plan user
From the Watson Studio home page, select Creat a project, then select the Create an empty project and choose a name for your project then press create .
- create a watson studio project see tutorial here.
- create a new notebook from watson studio with GPU support.
- the notebook should have a GPU support click here to learn how to create a notebook with GPU support.
- Use the From URL option and
use this URL for GPU supported notebook: https://github.com/IBM/ASL-Pytorch/blob/master/ASL_v2-GPU.ipynb
or use this URL for CPU notebook(LITE) : https://github.com/IBM/ASL-Pytorch/blob/master/ASL_PyTorch-CPU.ipynb
To view your notebooks, select Notebooks in the project Assets list. To run a notebook, simply click on the edit icon listed in the row associated with the notebook in the Notebooks list.

Follow notebook instructions to load data and train the model.
Cells are how notebooks are structured and are the areas where you write your code. To run a piece of code, click on the cell to select it, then press SHIFT+ENTER or press the play button in the toolbar above. Additionally, the Cell dropdown menu has several options to run cells, including running one cell at a time or to run all cells at once.
The last two cells in the notebook is where we test our trained model. run the last model many times to check different samples.

- learn more about Pytorch
- Create Watson Studio Notebooks
- Learn more about GPU environments
-
Get started with PyTorch : In this article, you can find an overview of the PyTorch system and learn more about the supported platforms and the benefits of using PyTorch.
-
Multiclass image classification of yoga postures using Watson Studio and Deep Learning as a Service