Always wanted to know how to build your own chatbot? This workshop shows how to achieve this using the Watson Conversation API. You will start by:
-
creating your own Watson Conversation service
-
importing an existing configuration to give your bot a jump start
-
extending the bot's functionality to your own discretion.
-
(optionally) deploy a NodeJS application to Bluemix that exposes your bot via Socket.IO
At the end of the workshop you have a functioning chatbot capable of handling greetings, requests to turn on car appliances and it will respond to weather related questions.
To be able to use the Watson APIs, you need to have a Bluemix account. If you don't have one yet -- or you did not complete the initial set up of your Bluemix account -- follow the steps below.
Your account must have enough resources available for at least 1 application (256MB) and 3 services.
- When you already registered and completed the initial set-up of your Bluemix account, you directly jump to Step 1: Create a Watson Conversation service.
- Use Ctrl-click (or the equivalent action for your system) to open the Sign Up for Bluemix page in a separate tab. Fill in the form and click Create Account to complete the registration. You will receive an activation mail in your inbox.
-
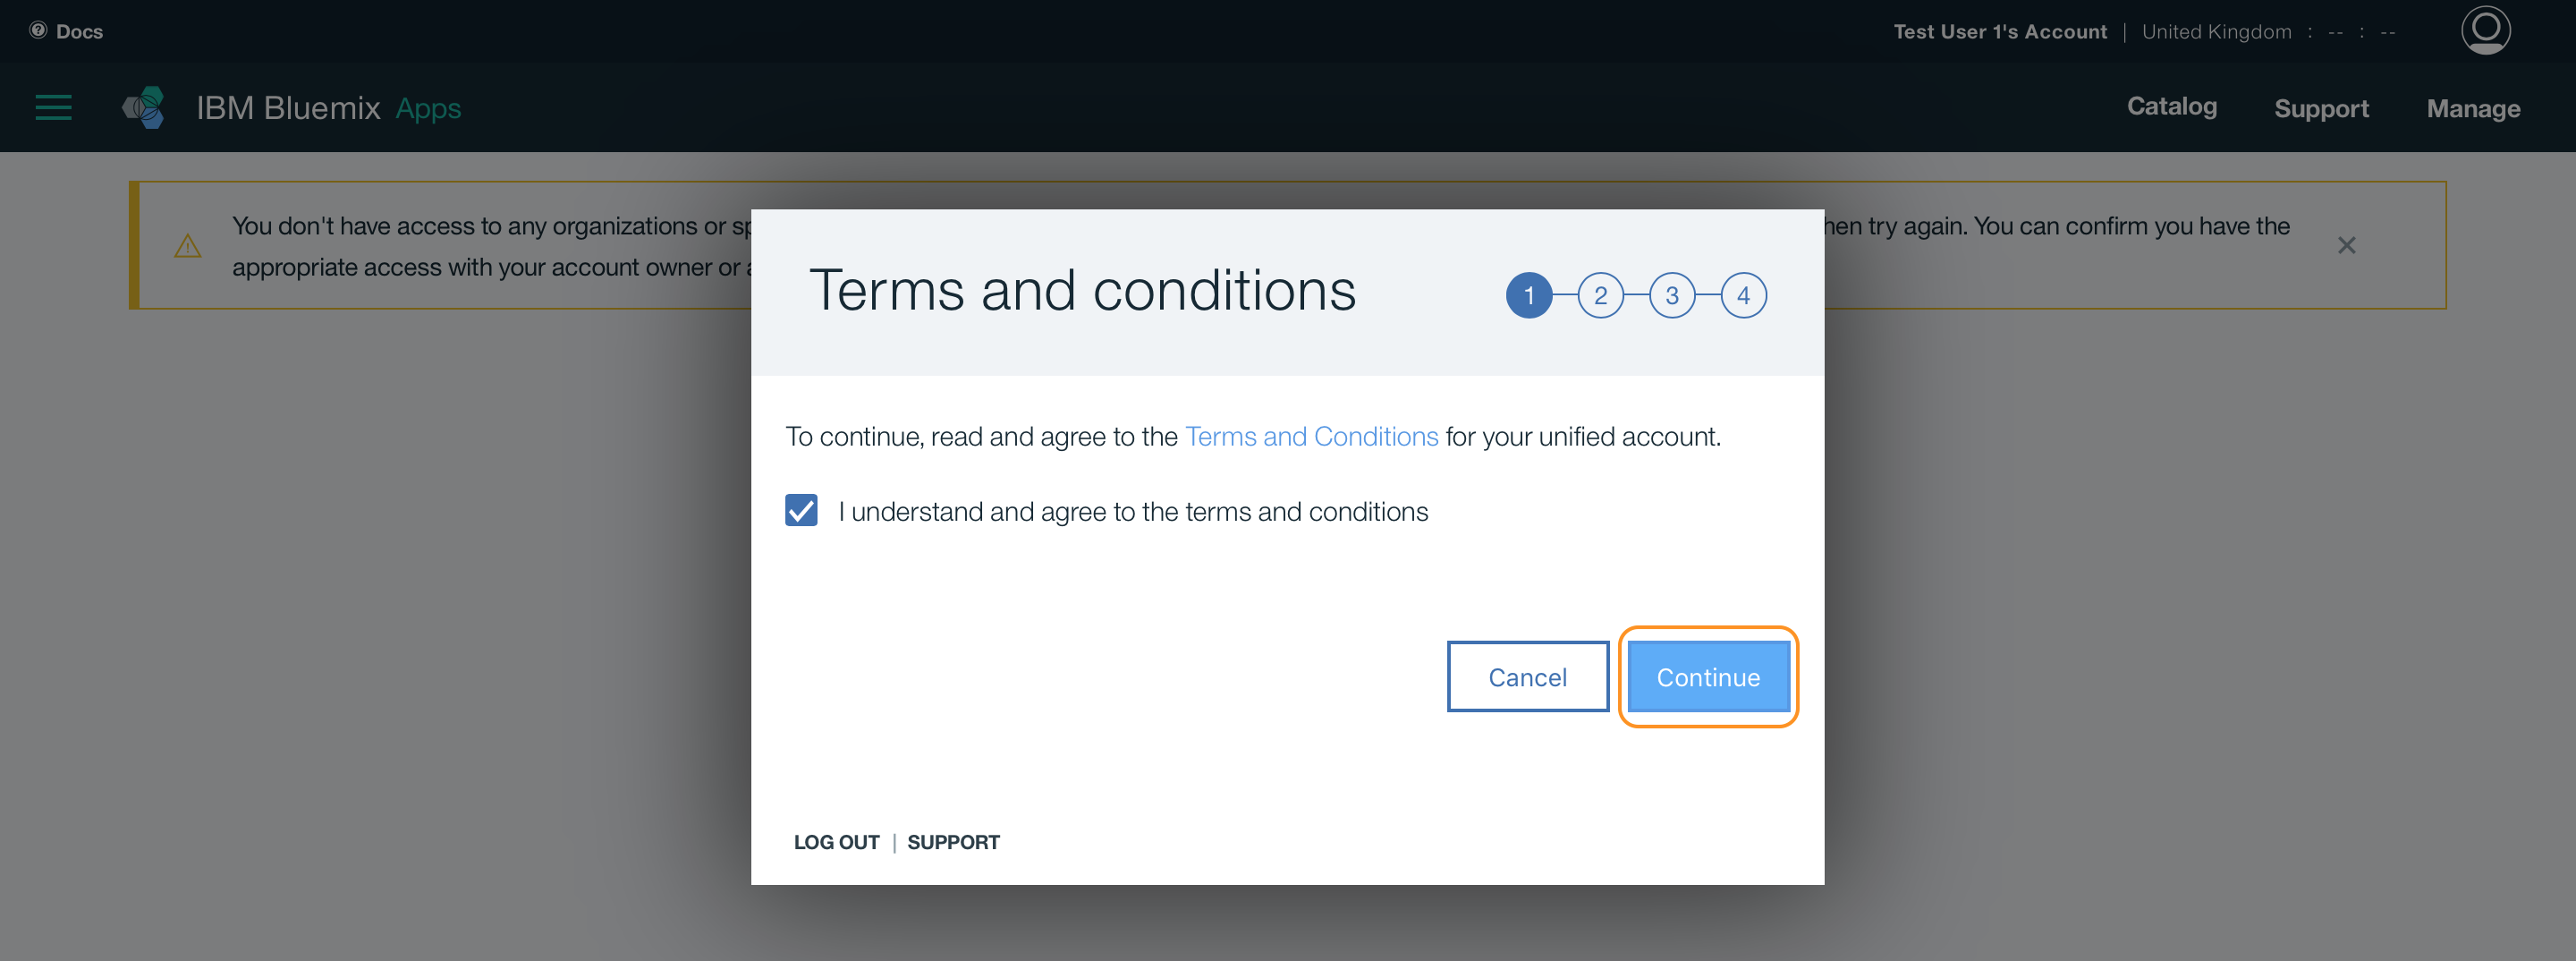
Use Ctrl-click (or the equivalent action for your system) to open the Login to Bluemix in a separate tab. First time users need to complete a 4-step wizard. This starts by accepting the terms & conditions.

Define a name for your organization

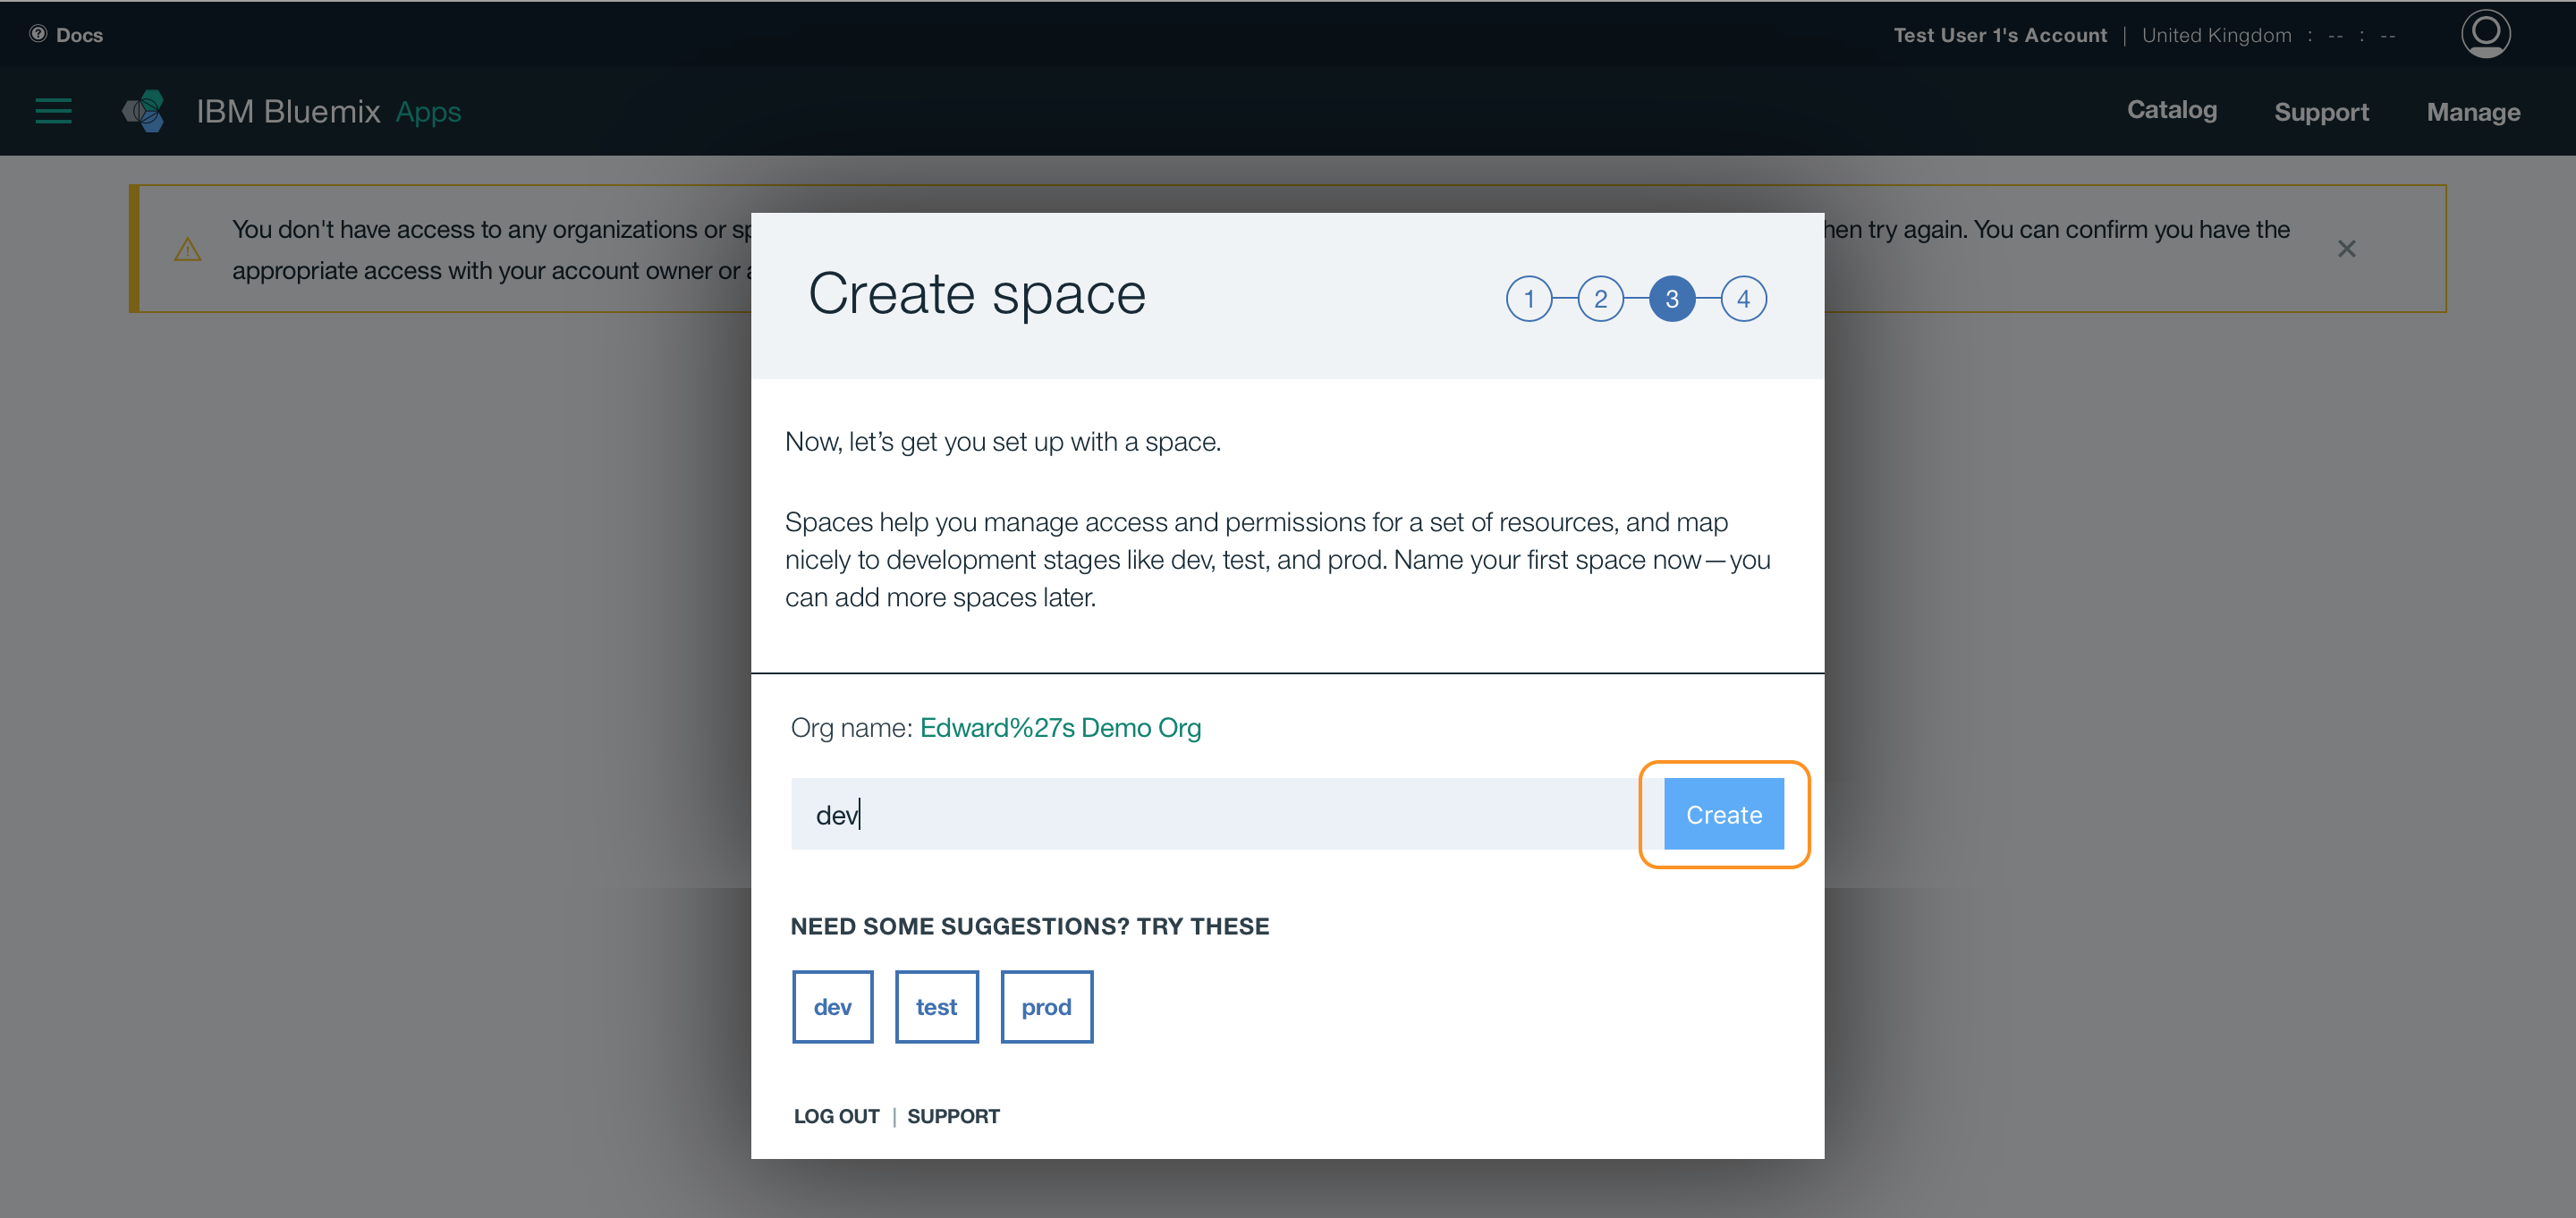
Choose a name for your space. Typically
devwould be a good name for your first space.
On the last page, click I'm Ready to complete the set up process.

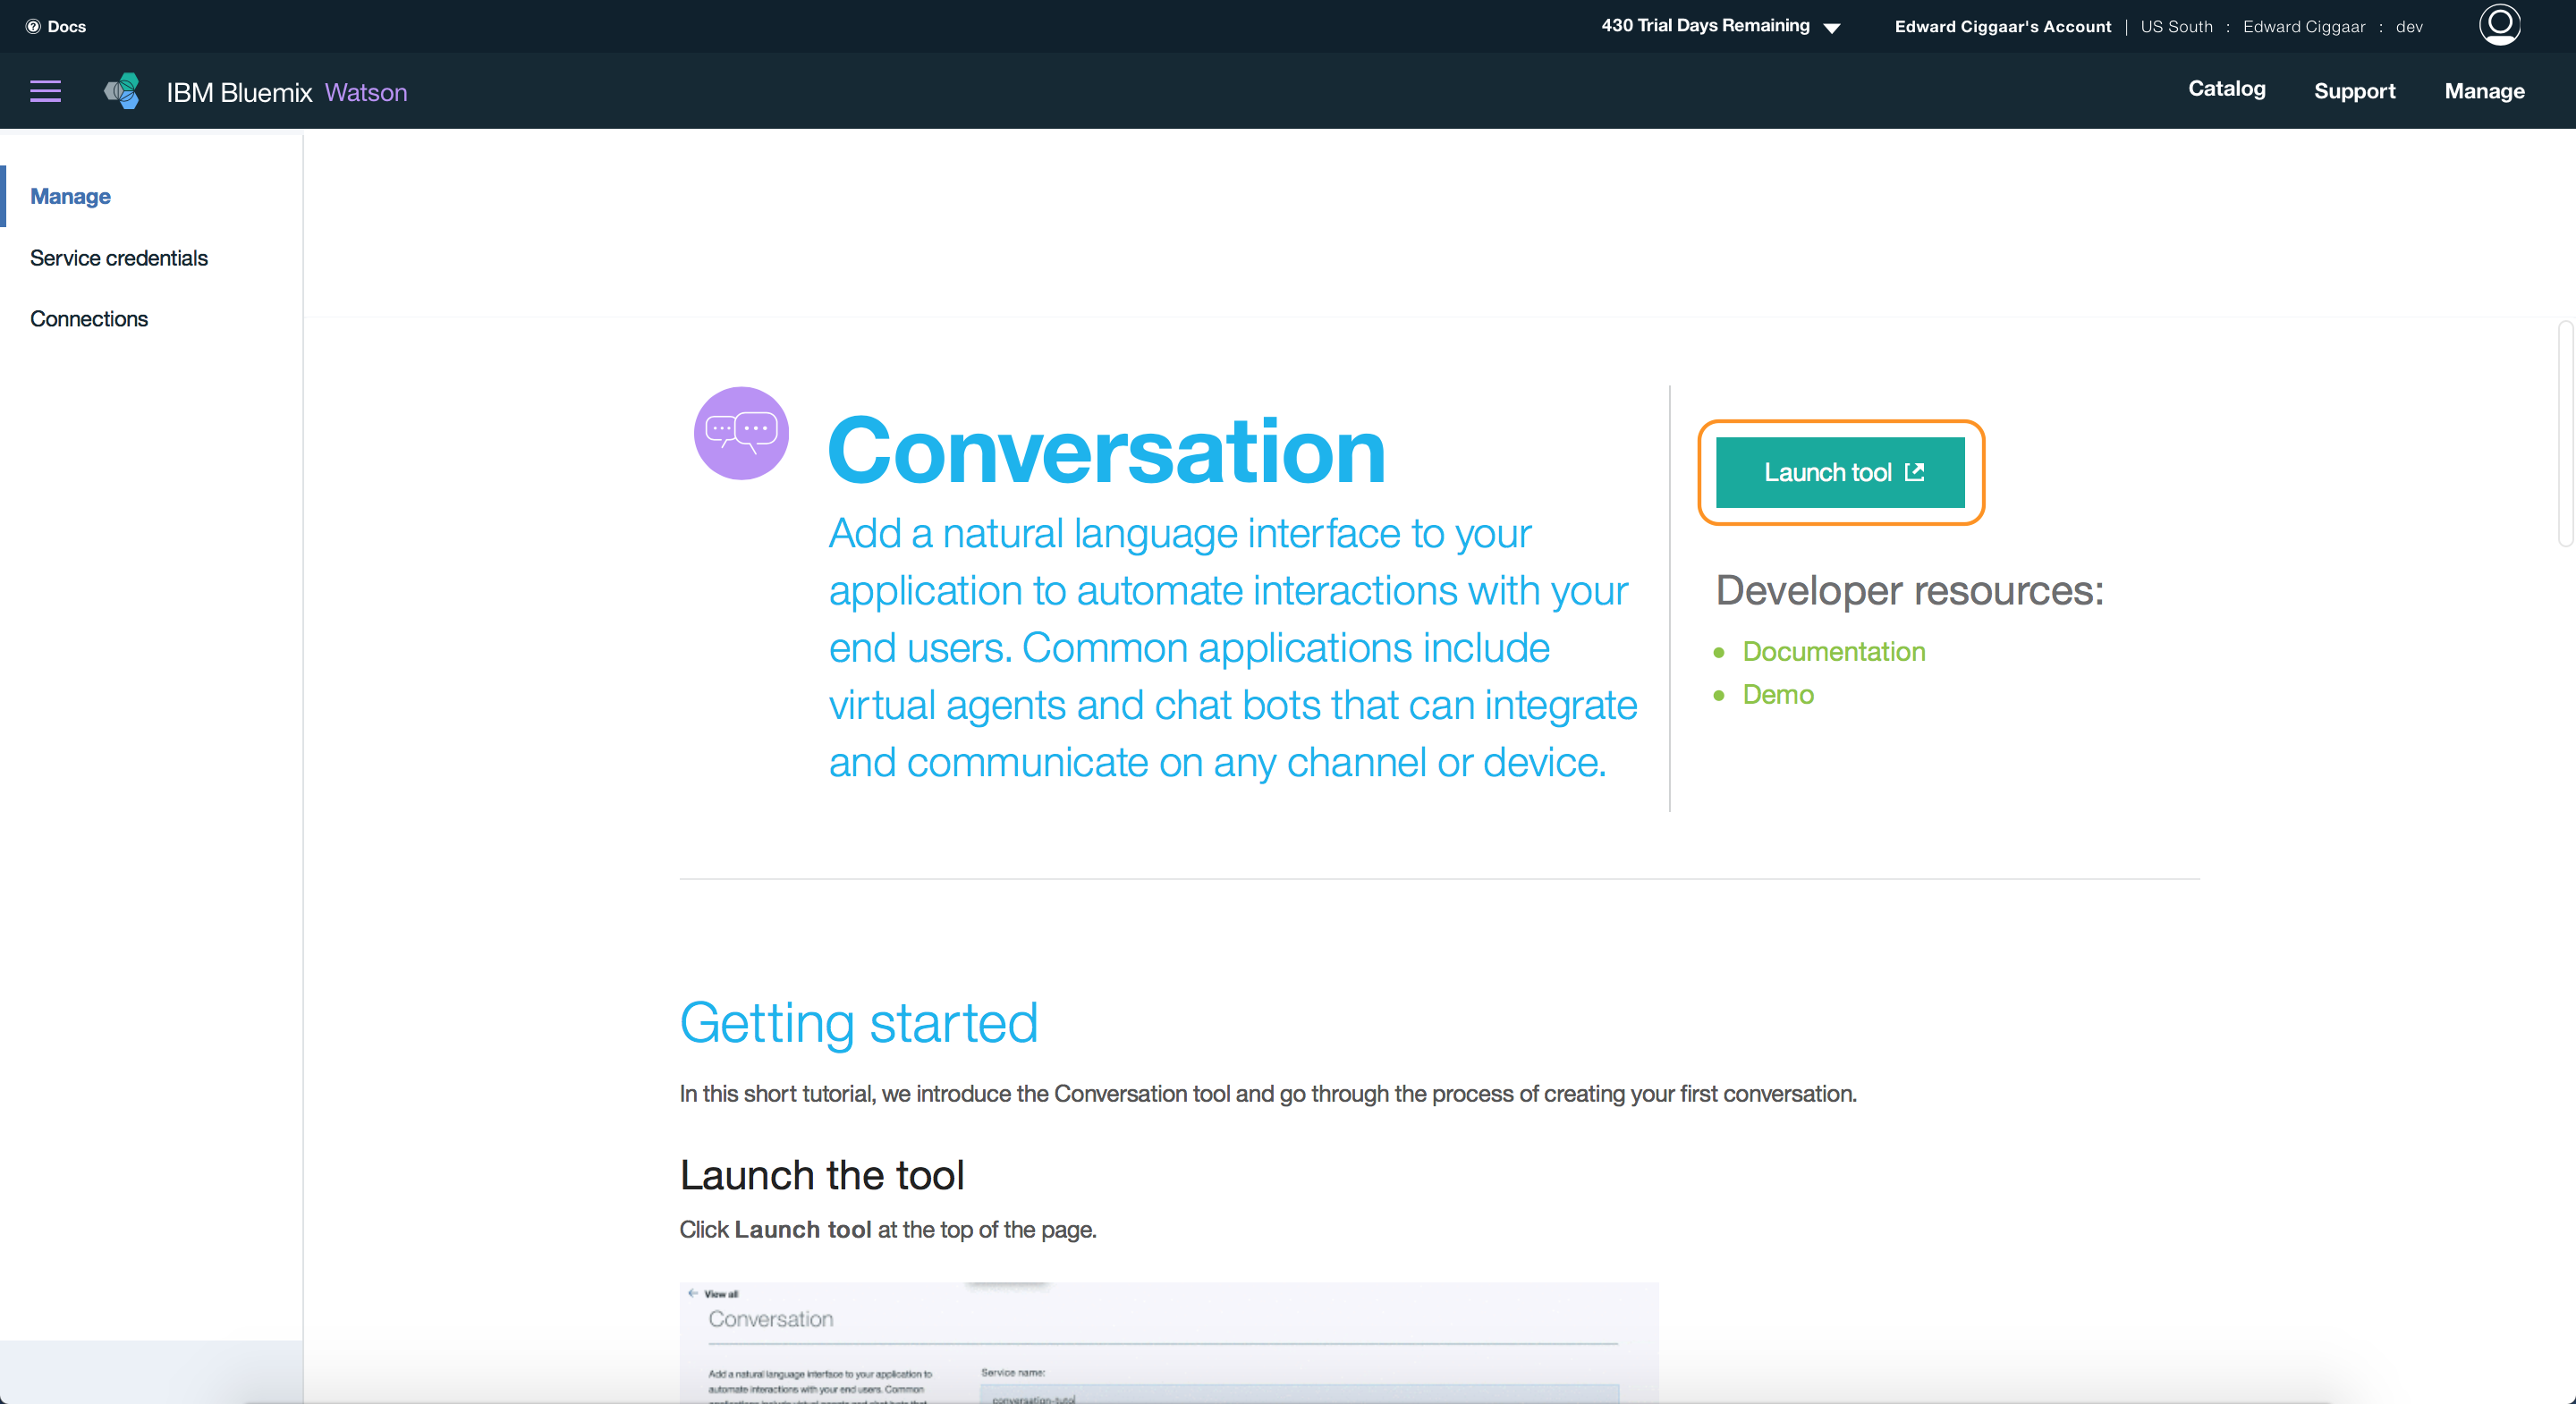
To start with your bot, you need to create a new instance of the Conversation service and launch the tool. For this, make sure that you're logged in to IBM Bluemix. Next,
-
Use Ctrl-click (or the equivalent action for your system) to open the service creation pane in a separate tab.
-
In the Service name field, specify
conversation-service.

-
Click Create.
-
Finally, on the Service Details page, click Launch tool to open the Conversation Tooling.
A workspace is a container for all the artifacts that define the behavior of your bot. To make life a bit easier for you, we've included a sample workspace to give your bot a jump-start. The steps below describe how to import this workspace into your service.
- Use Ctrl-click (or the equivalent action for your system) to open the sample workspace JSON file in a separate tab. Click Download to download this file to your own device.

-
If not already done, open the
conversation-serviceservice that you created in Step 1 and click on Launch tool to open the Watson Conversation Tooling. -
Click the import button and upload the file
demo_workspace.jsonthat you downloaded in the first step of this section.

You now successfully imported a sample workspace into your service. Next, the bot's functionality can be extended by defining more intents and entities. These will then be included into the bot's dialog.
An intent is a purpose or goal expressed in the user's input, e.g. answering a question or turning on an appliance in your car. By recognizing the intent expressed in the user's input, the Watson Conversation service can choose the correct dialog branch for responding to it.
- After the successful import in the previous section, you should see the following screen in front of you.

- On the Intents tab, select Create new and add the following intent name:
turn_on. This intent indicates that the user wants to turn on an appliance -- such as the car's radio, airco or headlights.

-
In the User example field, type
I need lightsas sample sentence and press Enter. -
Add these 4 more examples to help Watson recognize the
#turn_onintent and hit Enter:
  Listen to some music
  Play some tunes
  Air on please
  Turn on the headlights
Finally, click Done at the top right to complete the intent creation. You now defined an additional intent #turn_on with example utterances. These examples help train Watson to recognize the intents in the user's input.
An entity definition includes a set of entity values that can be used to trigger different responses. Each entity value can have multiple synonyms, which define different ways that the same value might be specified in the user's input.
Create entities to represent what the user wants to turn on.
- On your workspace page, click the Entities tab.
- On the Entities tab, click Create new and add an entity named
appliance.
The @appliance entity represents an appliance in the car that a user might want to turn on. This could be the radio, the airco or e.g. the lights.
-
Add
musicas value in the Value field.The value represents a specific appliance that users might want to turn on. -
Add
radioin the Synonyms field as another way to specify the music appliance entity. -
Click the plus sign (+) to define additional values for
@appliance.-
Value:
headlights. Synonym:lights. -
Value:
air conditioning. Synonyms:airandairco.
-
Click Done when finished.
-
Repeat the process to create the
@genreentity with 3 values and synonyms:-
Value:
classical. Synonym:symphonic. -
Value:
rhythm and bluesSynonym:r&b -
Value:
rock. Synonym:pop
-
You defined two entities: @appliance -- representing an appliance that can be turned on -- and @genre representing a genre of music the user can choose. The next section will explain how you can extend the existing dialog to use these intents and entities and set the correct response.
A dialog is a set of conversational nodes that are contained in a workspace. Together the set of nodes makes a dialog tree, on which every branch is a conversation that can be held with a user. A Welcome, Get weather info and Greeting branch are already set up for you.
Now we are going to extend the dialog by adding a branch that responds to the #turn_on intent. Because there are multiple possibilities for what the user might want to turn on, this branch represents a more complex conversation.
For this, we start by creating the root-level node:
-
Click the options icon
 on the right-hand side of the
 #greetingnode and select Add node below to create a new root-level node. -
In the Name this node field, enter
Turn On. The title does not affect the processing of the node, but it makes it easier to find. -
In the edit view, in the Enter a condition field, start typing
#turn_on. -
Select #turn_on from the list. This condition is triggered by any input that matches the
#turn_onintent. -
Do not enter a response in this node and click
 to continue.


The #turn_on intent requires additional processing, because the dialog needs to determine which appliance the user wants to turn on. To handle this, we create multiple responses based on additional conditions. There are three possible scenarios, based on the intents and entities that we have defined:
-
The user wants to turn on the music, in which case we need to ask for the genre.
-
The user wants to turn on any other valid appliance, in which case we simply echo the name of the requested appliance in a message that indicates that we're turning it on.
-
The user does not specify a recognizable appliance name, in which case we need to ask for clarification.
We'll check the conditions in this order. Determining the most efficient order in which to check conditions is an important skill in building dialog trees. If you find a branch is becoming very complex, check the conditions to see whether you can simplify your dialog by reordering them. It's often best to process the most specific conditions first.
To check the input, add a child node:
-
Click the options icon
on the right-hand side of the #turn onnode and select Add child node to create a new child node. -
In the Name this node field, enter
Music. -
Under Enter a condition, enter
@appliance:music. This condition is true if the value of the@applianceentity ismusicor one of its synonyms, as defined on the Entities tab. -
In the Enter a response field, enter
What kind of music would you like to hear? -
Exit the edit view of this node by clicking
.
We want to jump directly from the Turn On node to the Music node without asking for any more user input. To do this, we use a Jump to action.
- Click the options icon on the right-hand side of the Turn on node and select Jump to.
- Select the Music node, and then select If bot recognizes (condition). We want to process the condition of the Music node.
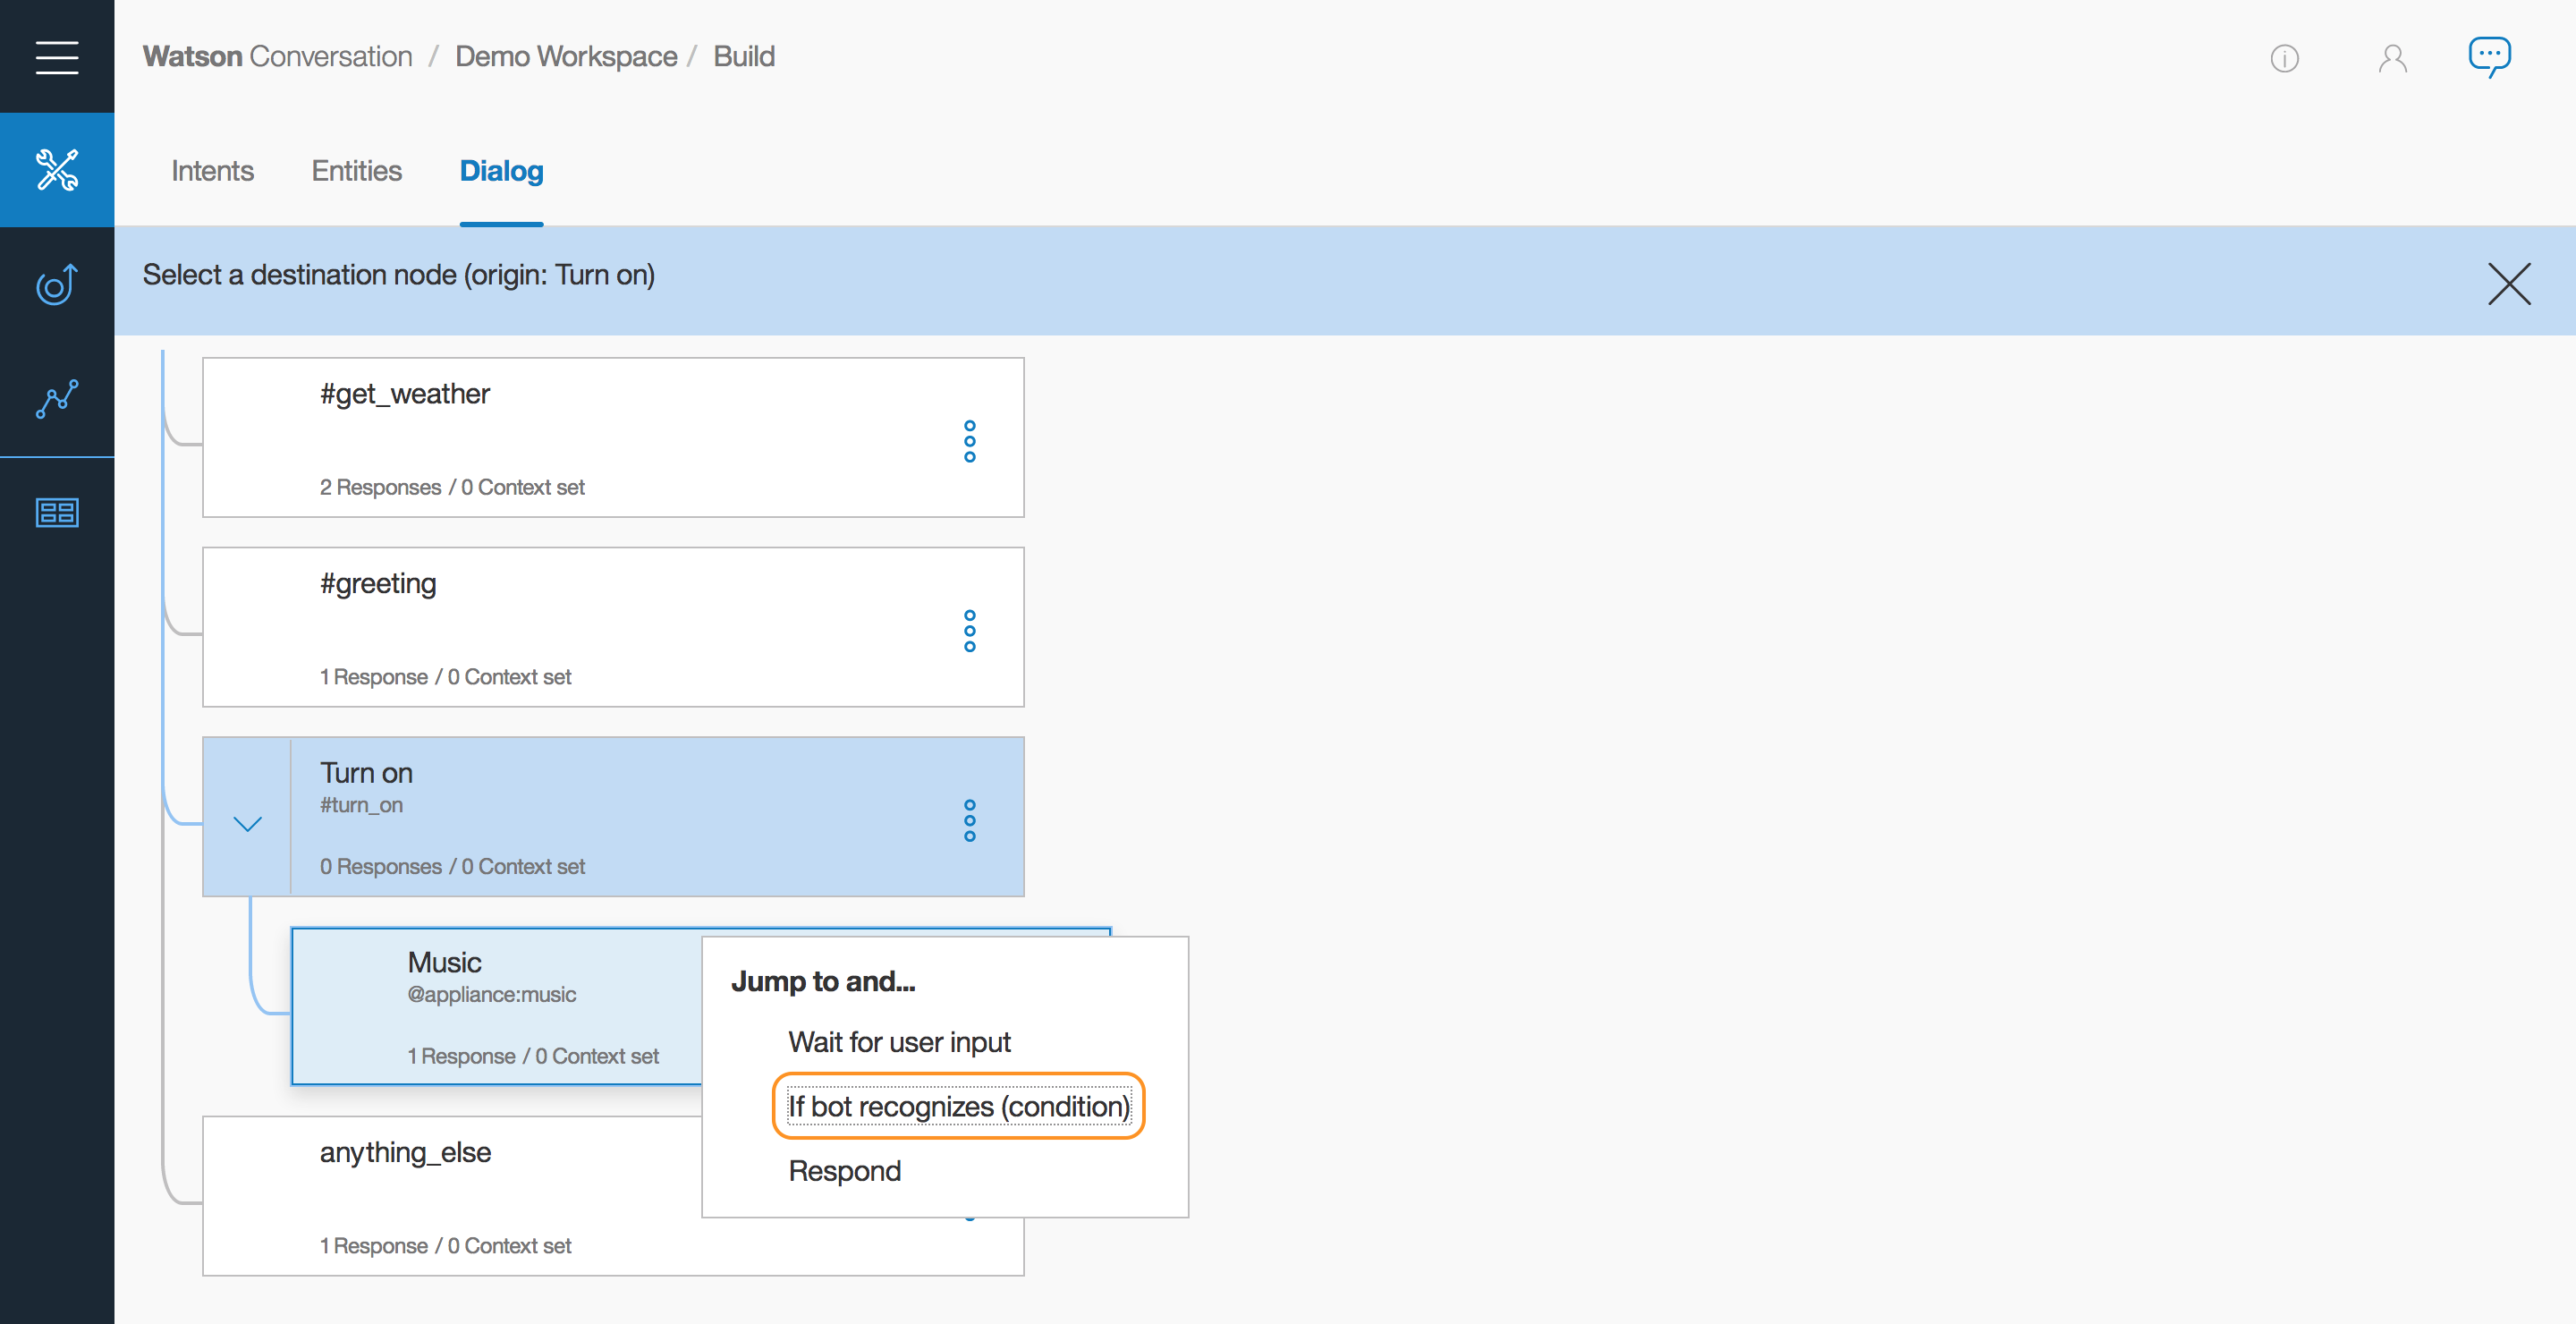
Note that you had to create the target node -- the node to which you want to jump -- before you added the Jump to action.
After you selected the place where to jump to, you should see the following in your dialog:

Now we need a node to process the type of music that the user requests.
-
Click the options icon
on the right-hand side of the Music node and select Add child node to create a child node. Enter Genrein the Name this node field. This child node is evaluated only after the user has responded to the question about the type of music. Because we need a user input before this node, there is no need to use a Jump to action. -
Under Enter a condition, enter
@genre. This condition is true whenever a valid value for the@genreentity is detected. -
In the Enter a response field, enter
OK! Playing @genre.This response uses the value that the user entered.
We also need a node to respond when the user does not specify a recognized value for @genre.
-
Click the options icon
on the right-hand side of the Genre node and select Add node below to create a peer node. Name it Genre not recognized. -
Under Enter a condition, enter
true. This condition specifies that if the dialog flow reaches this node, it should always evaluate as true. If the user specifies a valid@genrevalue, this node will never be reached. -
In the Enter a response field, enter
I'm sorry, I don't understand. I can play classical, rhythm and blues, or rock music.

That takes care of all the cases where the user asked us to turn on the music.
In this section we'll test the conversation via the chat pane.
-
Select the
 icon to open the chat pane.
 -
Type
Play music. The bot recognizes the#turn_onintent and the@appliance:musicentity, and it responds by asking for a musical genre. -
Type the name or a synonym for a valid
@genrevalue (for example,pop). The bot recognizes the@genreentity and responds appropriately. -
Type
Play musicagain, but this time specify an invalid response for the genre.

The bot responds that it does not understand.
Next, we'll create a node that is used when the user specifies any other valid value for @appliance. For these other values of @appliance, we don't need to ask for any more input. We just give a positive response.
-
Select the Music node, so that the options to create child and peer nodes are displayed.
-
Click the options icon
on the right-hand side of the Music node and select Add node below to create a peer node. -
Under Enter a condition, enter
@appliance. This condition is triggered if the user input includes any recognized value for the@applianceentity, except music. -
In the Enter a response field, enter
OK! Turning on the @appliance.This response uses the value that the user entered.
Now add a peer node that will be triggered if the user input did not specify a valid appliance:
-
Click the options icon
on the right-hand side of the @appliancenode and select Add node below to create a peer node. -
Under Enter a condition, enter
true. This condition specifies that if the dialog flow reaches this node, it should always evaluate as true. If the user specifies a valid@appliancevalue, this node will never be reached. -
In the Enter a response field, enter
I'm sorry, I don't know how to do that. I can turn on music, headlights, or air conditioning..
We will now test the conversation again with the other appliances.
-
Select the
icon to open the chat pane. -
Type
Lights on.
The bot recognizes the #turn_on intent and the @appliance:headlights entity, and it responds with OK, turning on the headlights.
- Type
Turn on the airco.
The bot recognizes the #turn_on intent and the @appliance:(air conditioning) entity, and it responds with OK, turning on the air conditioning.
- Try variations on all of the supported commands based on the example utterances and entity synonyms you defined.
If the bot fails to recognize the correct intent, you can retrain it directly from the chat window. Select the incorrect intent and type the correct one in the field.
Tip: Don't include the # character when you type the intent name.
Now that your bot is complete, you can experiment by enhancing it with new functions. For example:
- Define entities for additional appliances and musical genres
- Add synonyms for entities
- Add a new intent to turn off appliances
- Add capability for turning on music and specifying a musical genre with a single command
To see your bot live in action, using a sample NodeJS application, press Ctrl-click (or the equivalent for your system) to open the button below in a separate tab. This deployment sets up a delivery pipeline for which the Continues Delivery service is created. Until now, this service is only available in the US region of Bluemix.
To make sure you have a space in this region as well, use Ctrl-click to open the dashboard of this region. If you are all OK, you get the dashboard. Otherwise, you will be asked to create your first space in this region -- as depicted in the screenshot below.

Use Ctrl-click (or the equivalent for your system) to open the deploy-to button below in a separate tab.

In the Delivery Pipline section, choose the United Kingdom (Production) as region and select the space where you deployed your Watson Conversation service to (most likely dev).

Click Deploy to start the deployment. You can check the deployment by clicking the Delivery Pipeline tile in the toolchain.
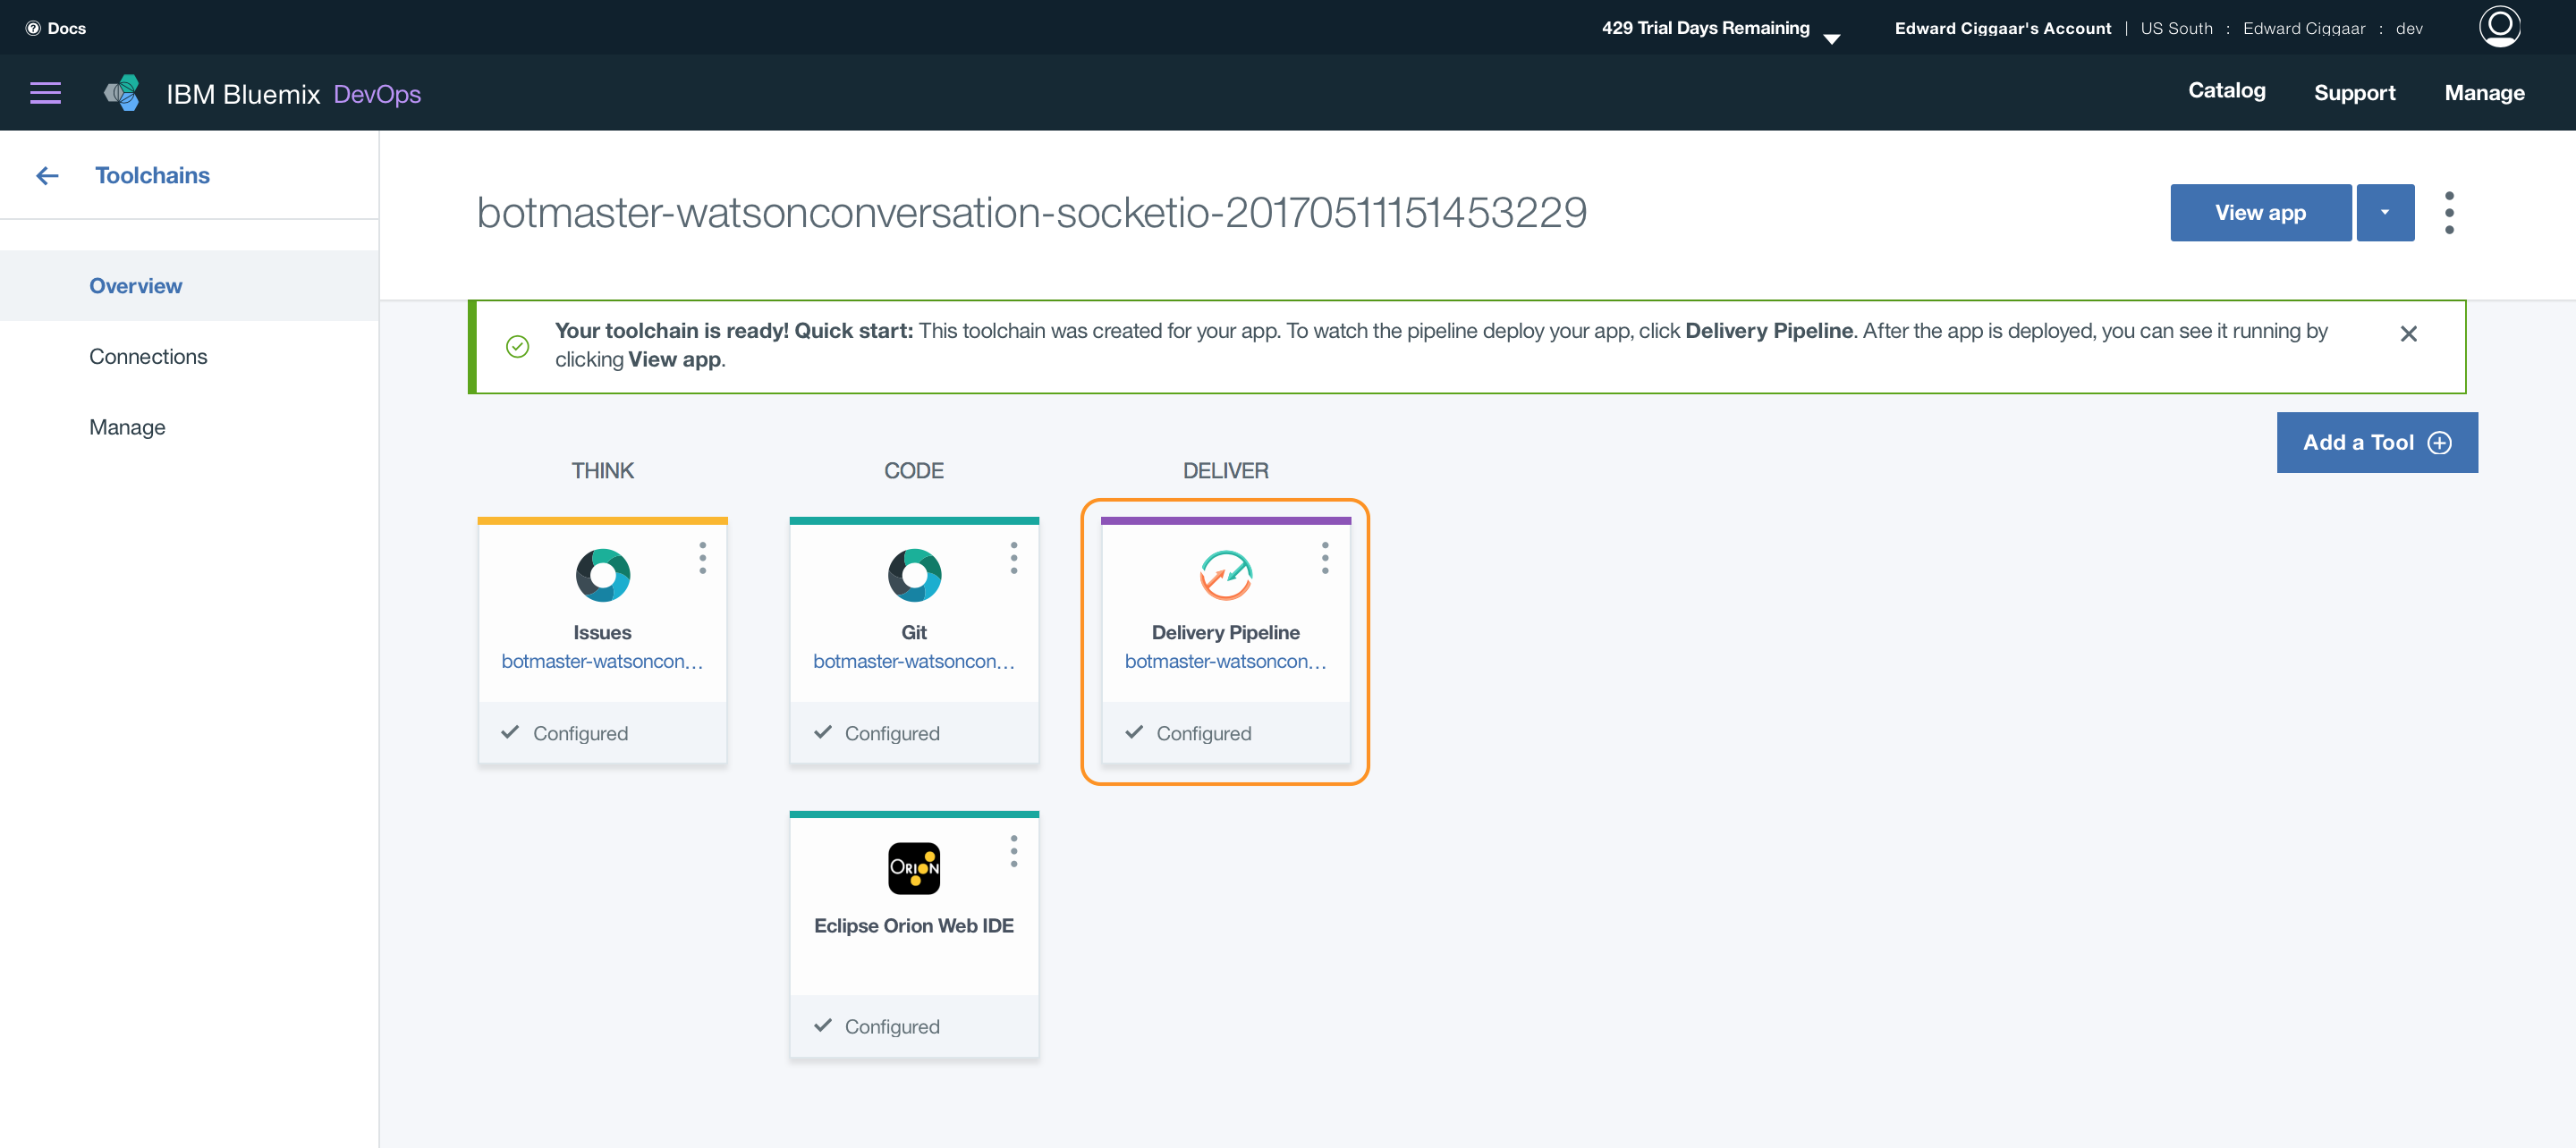
Once the Deploy Stage is also successfully completed, select the URL to view your app.

Congratulations!! You've built your own bot in a snap!! 😃 😃
The sample code which is deployed via the Deploy to Bluemix button is licensed under Apache 2.0. Full license text is available in LICENSE.
The node sample web application, that is deployed for you when clicking the Deploy to Bluemix button, includes code to track deployments to Bluemix and other Cloud Foundry platforms. The following information is sent to a Deployment Tracker service on each deployment:
- Application Name (
application_name) - Space ID (
space_id) - Application Version (
application_version) - Application URIs (
application_uris)
This data is collected from the VCAP_APPLICATION environment variable in IBM Bluemix and other Cloud Foundry platforms. This data is used by IBM to track metrics around deployments of sample applications to IBM Bluemix. Only deployments of sample applications that include code to ping the Deployment Tracker service will be tracked.
Deployment tracking can be disabled by removing require('cf-deployment-tracker-client').track(); from the beginning of the app.js file at the root of its repo.
- Botmaster Documentation : Botmaster Documentation
- Watson Conversation Documentation : Watson Conversation
- Watson Conversation Tutorial: Watson Tutorial