In this blog post, I will take a look at the steps that it takes to containerize a ReactJS Application using Docker.
If you are interested in how to containerize other types of applications, check out my previous article about containerizing a NodeJS application.
Dad Jokes Front-End
In my previous blog-post, we containerized a NodeJS application that would serve us quality dad jokes from the icanhazdadjoke API from a specified endpoint.
Now we will take that endpoint and integrate it into a frontend webpage built in ReactJS. The webpage will simply display a dad joke and a corresponding reaction gif (to truly confirm how hilarious the dad joke was).
If you'd like to follow along with my steps, please download the starter Dad Joke Frontend ReactJS application from my github.
![]()
Step 1: Create a Dockerfile
Open up a terminal on your local machine and change directory (cd) into Dad Jokes UI directory:
cd <location-path>/docker-jokes-ui
Once in directory, create a Dockerfile using the "touch" command:
touch Dockerfile
Now that we have our Dockerfile, we will input the lines below to containerize our application. Each line will execute in order setting up our container image and allowing our ReactJS application to run in our environment. This will be a muli-stage build process and will be broken down into two phases; a build-step and run-step. This will be explained a bit more below. And though I have covered some of what this code does in a previous blog, I will still breakdown each line separately below.
#Build Steps
FROM node:alpine3.10 as build-step

RUN mkdir /app
WORKDIR /app

COPY package.json /app
RUN npm install
COPY . /app

RUN npm run build

#Run Steps
FROM nginx:1.19.8-alpine
COPY --from=build-step /app/build /usr/share/nginx/html
First we will be grabbing a NodeJS image to put in our container. This will set up our environment to use Node, as we will need it to build our React application.
FROM node:alpine3.10 as build-step
You may have noticed the descriptor as build-step at the end of the line above. This is used because our application needs a "multi-stage" build process in order to work correctly; One to build the actual application from our React source code and the other to stage/run our application in the Docker container. This is an excerpt from Dockers documentation on "multi-stage" build:
"With multi-stage builds, you use multiple FROM statements in your Dockerfile. Each FROM instruction can use a different base, and each of them begins a new stage of the build. You can selectively copy artifacts from one stage to another, leaving behind everything you don’t want in the final image."
We will use our build-step artifacts in the second stage of our of Dockerfile build process. I will specify where this is happening a bit later.
Next, we are creating the directory where our application will be running out of in our container:
#Make app directory in container
RUN mkdir /app
Once the directory is created, we are identifying to the container that this will be our working directory, or where are application files will run/build from:
#Identify working directory
WORKDIR /app
After that, we are going to copy over our package.json file to our app folder. This holds all of our ReactJS framework dependencies for our project:
#Copy package
COPY package.json /app
We will then install all of our node module packages by running the npm install command in the container:
#Install rpm packages from package.json
RUN npm install
NOTE: During the docker run phase, this install process will take some time.
Once we have installed all of our dependencies, we are going to copy over all of our remaining project files into our app directory using the copy command. NOTE: The "." here just tells the code to copy all files from our current directory:
#Copy over app to app folder
COPY . /app
To end the build-step phase, we will use the npm run build command to build our ReactJS application code so it can be deployed in our container. If you are familiar with the ReactJS build process, then this line of code probably looks very familiar:
#Command to build ReactJS application for deploy
RUN npm run build
Now that our React application has been built, we now need to deploy it into our Docker environment. This will begin our run-step phase.
First thing we will do in this phase, is get the nginx image that will be used for running/staging our application. The nginx image will create an nginx server where we will be able to deploy our ReactJS application:
FROM nginx:1.19.8-alpine
Finally, we will copy over our build-step ReactJS build folder to the nginx server html folder. This will allow our build of our ReactJS to be accessible in our container.
COPY --from=build-step /app/build /usr/share/nginx/html
![]()
Step 2: Create a .dockerignore
Next we will create a .dockerignore file. This file will allow us to "ignore" specific files when building our docker image, which will help us save us build time and ensure we don't accidentally overwrite any installed files in our image.
node_modules
build
.dockerignore
Dockerfile
Dockerfile.prod
![]()
Step 3: Build Docker Image
Our next step will be to build our Docker Image that we will want to run in our container. Here is the format of the command we will be using in our terminal for creating our Docker Image.
docker build -t <image-name>:<tag> .
So what's happening here:
- docker build initiates the Docker Image building process
- -t Flag used for tagging build 'name:tag' format
- image-name is our desired image name
- tag is our desired tag for this version of the image. Used for deploying different versions of images
- . signifies the path that we will be building from. NOTE: This is absolutely necessary for the build command to work
If you are interested in learning more about docker build commands and flags, check out the Docker Build Documentation for more info.
So in my case this is what my build command will look like (feel free to use this command as well).
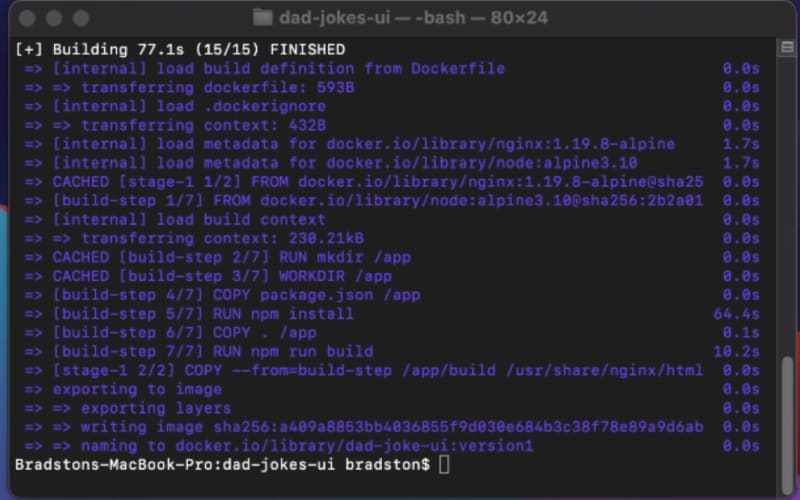
docker build -t dad-joke-ui:version1 .
Once you've inputted the build command, press return and the docker should begin to build. You should see something like this appear in your terminal window:
One thing to note, is that if you had not added the tag to the build command, it would have automatically tagged this build as latest.
![]()
Step 4: Run Docker
Now let's run our Docker and see it in action.
The next command we will run in the terminal will look like this:
docker run -p 8080:80/tcp -d <image-name>:<tag>
So what's happening here:
- docker run runs our Docker image within our container
- -p is used to set the port we want to expose outside of our container to our host
- _8000:80/tcp exposes our application, hosted in our nginx server at port 80 in our container, on our local machine at the 8000 port
- -d allows our container to run in the background, allowing us to continue to use our terminal.
In my case, the command will look like this:
docker run -p 8000:80/tcp -d dad-joke-ui:version1
Once you've inputted the run command, press return and the docker should begin to run the Docker Image on your local machine. You should see something like this appear in your terminal window:

This is your Container ID for your newly running docker image.
If you are interested in learning more about docker run commands and flags, check out theDocker Run Documentation
![]()
Step 5: Verify Docker is Running and its Expose Port
Once we have our Dad Joke Front-end Image running in our Docker container, we should verify that it is not only running but that we know which port the image is being exposed at on our local machine. In order to verify, we will need to run this command in our terminal:
docker ps
When you run this command you should see something similar to this:
![]()
Essentially, the docker ps command lists all available running containers in our Docker environment. If we do not see our docker image listed in the list of available containers, then we did something incorrectly in a previous step and must fix that error. In my particular case, you should be able to see that the Docker port 80 is now being exposed at the port 8080 on my local machine (outside of the containerized environment).
![]()
Step 6: Use Dad Joke Frontend in Docker
Now that we have have verified that our application image is running, it's finally time to use it.
So now we will open the browser of our choice and we will enter in the address bar, this web address:
http://localhost:8080/
If everything is working correctly, we should be presented with the ReactJS Dad Joke front-end application. You should see something like this:
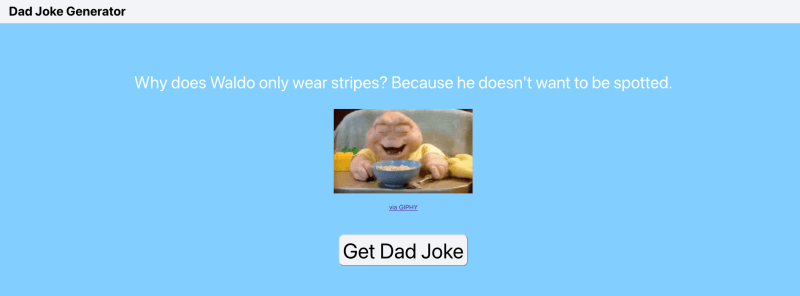
NOTE: You need to have the Dad Joke API application running on port 8000 in order for the application work correctly. Download completed Dad Joke API from my github and build and run. Use my previous blog if you need run and build step instructions
To see the application in action, click the "Get Dad Joke" button.
You Did It! You successfully containerized your first ReactJS Application. Not only have done that, but you have now seen how can consume a containerized NodeJS API using Docker.
Interested in deploying a react app into the cloud. Check out my blog to learn how to do it step-by-step:


![]()
==== BONUS LEARNING ====
Containerization: Starting with Docker
https://developer.ibm.com/technologies/containers/tutorials/building-docker-images-locally-and-in-cloud/
Learn more about Containers: https://developer.ibm.com/technologies/containers/
![]()
==== FOLLOW ME ON SOCIAL MEDIA ====
Twitter: Bradston Dev
Dev.to: @bradstondev
Youtube: Bradston YT


Top comments (4)
Great intro. Your docker run command is from the previous article (dad-joke-api) instead of dad-joke-ui
Thanks! I really appreciate that!
And good catch! I totally missed that typo. Thanks!
So glad I read this. Thanks for taking the time to make a very helpful and well written article
Thanks Mark! I really appreciate that. Super happy it was helpful! Really enjoyed putting it together!