Something I was realizing recently is that From Slack, to Facebook Messenger, to Discord, digital messaging between friends and colleagues has become more than commonplace, it's almost a necessity. But my question was, what does it really take to make a space where people can chat and discuss in realtime? Well that's what this blog is all about. How to make your own chat room from scratch. A real chat room that you can actually use with friends or whomever you may to desire to invite.
So in this blog I will try to explain the basics behind how a chat room works and how to create a working one that runs on the cloud for free using tools that everyone has access too.

This blog may seem a bit hefty but I am very confident that after reading through this blog you will understand the basics behind creating a chat room with React and Node and how to expand beyond what I have done with these tools.
Because of it's heftiness I will be breaking this blog into two parts. If you have already done part 1, you can find part 2 here: Part 2
How our chat room will work
So before we jump into code, let me explain how our simple chat room will operate. Our simple chat room will consist of two major parts:
- A Client application: A ReactJS application where chat messages can be shown to users and sent to other users
- A Server application: A NodeJS application that will manage messages sent between users in realtime using socket.io
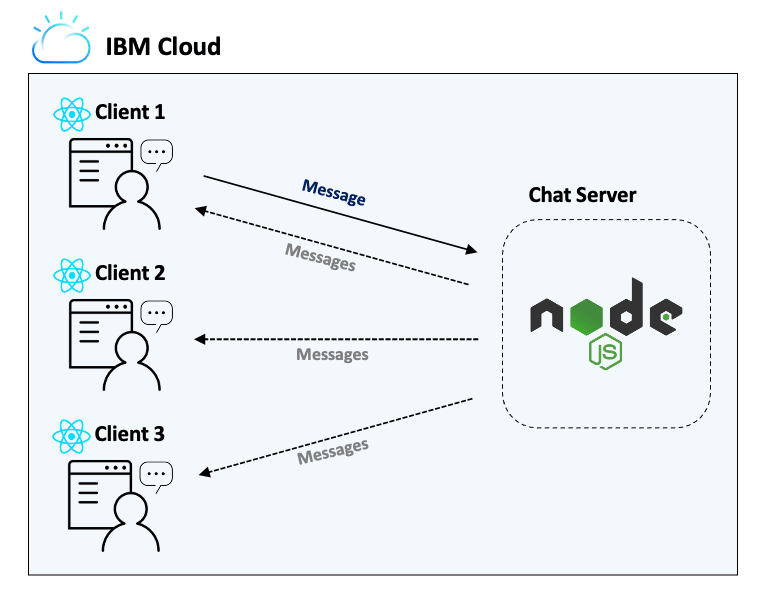
Here is a simple illustration of the architecture for our application:
![]()
As you can see (hopefully), our Clients, the ReactJS Application, will communicate with our server, the NodeJS application, by sending a chat message to the server. In turn, the server will configure messages received and send them back to any client connected to it. The key thing to note is that the server can communicate with multiple clients at the same time, in real-time. So basically, each client will have be able to send and receive chat messages and the server's job is to receive new messages and make sure that all clients/users using the application are shown the new messages in realtime (without needing to reload their application manually).
How does the real-time messaging work
So one question you may have is, how do all the clients receive new messages in real-time? Why doesn't the client or user need to reload their page to see changes that happened on the server? How is the Node server communicating with the ReactJs client application?
Well the simple answer to your questions is socket.io!
So what is socket.io?
Using a direct quote from the socket.io website:
"Socket.IO is a library that enables real-time, bidirectional and event-based communication between the browser and the server".
Essentially, socket.io allows realtime communication between applications with very little delay. You can liken it to having two applications talking to each other on the phone; When one application says something and the other application "hears" what they said almost immediately.
So how does that differ from how applications generally operate?
Consider trying to track a package on a standard shipping companies website. In most cases, in order for you to see updates on you package status or location, you would have to visit the tracking page, and periodically reload page to see if there were any updates. If the package tracking website was using socket.io, you could stay on the page indefinitely and whenever your package had a status change, the page would immediately update with that new info; No need to constantly reload the webpage, hoping that some type of change happened.
Similarly, socket.io will allow us to create a chat room where anytime a user sends a message to the chat room, all users connected to the chat room will immediately see the message, without needing to reload the page.
Going back to the phone call analogy, our application will allow for all users to join the conversation, allowing them to hear what every other user "says" when they "say" it.
For the sake of time, I won't go into the technical details of socket.io, but if you are interested in learning more about the inner workings of it, check out the socket.io website.
Creating our Socket.io/NodeJS Server
So the first thing we will need to do is to create our server that will manage all of our client/user chat communications.
In order to save us some time, I have created a base NodeJS Server with some basic code but it will now be our job to add the remaining code we need to get our server set up to receive messages and send messages via socket.io. Go ahead and download the base code from my github to get started.
So here is quick overview of what we will be doing with our Node server:
Installing and configuring our Node application to use socket.io
Implementing Socket methods to allow our Node server to communicate with our client application
Deploying our NodeJS Server to the cloud so it can be accessible to our Client from anywhere
So let's get into it...
Installing and Configuring Socket.io with NodeJS
First step is to navigate to our NodeJS server base code on your local machine using a terminal/command line window:
cd <your-path-directory>/simple-node-chat-server
Once we have navigated to our source code, we are going to run a simple npm command that will install all necessary frameworks and dependencies for our base node application to work. so run this command (if you do not have npm installed on your system, visit here for installation instructions):
npm install
Note: This command will install all dependencies located in our package.json file in this directory
Once we have installed all the needed framework packages, we need to install our socket.io package to our project.
Next, run this command:
npm install socket.io --save
As the command suggests, it installs the socket.io package and --save ensures that dependency gets saved to our package.json.
Once we have installed, we will configure socket.io on our NodeJs server.
Open the file called "server.js" in our _simple-node-chat-server- directory and at the bottom of the file insert this code:
var io = require('socket.io')(server)
Essentially what we are doing here, is configuring socket.io to run on our server. We are connecting it or binding it to our "server" object. This tells our server, which we configured previously in the code, that socket.io will be running on it.
Our NodeJS server is now configured to user socket.io. 😎
Implementing Socket Methods on NodeJS server
Now that we have installed socket.io, we need to create a few socket methods that will allow our React application that shows our chat to connect with and use it.
But before we implement these methods, we need two variables that we will be using to store the chat room message data and current connect users, Also we will need a base socket.io method that manages the connections between server and client. Add these to lines at the bottom of our server.js file.
var chatRoomData = []
var connectedClients = {}

io.on('connection', (client) => {

})
Essentially the chatRoomData variable stores the actual chat room messages and data. It will be the data used to display chat messages in our React client application.
connectedClients keeps track of who is in our chat room (by userID). This makes it possible to know who is disconnecting from the chat room at any given time.
The lines io.on('connection',... is *essential. It is actually the function that establishes the connection between this server and the client (aka tha React application). This function returns a client as an object to represent the client that is connected via the socket at the moment. The server uses this object to listen for client actions and to send the client messages NOTE: All methods that we will discuss below will be inside this io.on('connection',... method. They will need to be inside this function in order to communicate with the client.
So now let's discuss the few socket.io methods we will need to create manually to make this Chat Room possible. Here is a brief description of each socket method we will be using:
SendMessage: This socket method will let us know whenever a new message has been sent by a client/user. This will add the new message to the chat room and notify all clients/users of this new message.
UserEnteredRoom: This notifies the server that a user has successfully entered the chat room, and sends a message to the chat room conveying this information.
CreateUserData: This method creates an identity for new users in the chat room. Their username and id are randomly generated and allows for client to save this information for future. This ensures that all clients in the chat room have an identity associated to them when they send messages.
disconnecting: This is a "reserved" socket method that informs socket when a client is disconnecting. This method is called automatically whenever a client disconnects (e.g. closes the browser window). We are using this method to inform all users that a user has left the chat. NOTE: the term 'reserved' indicates that this method was created by the socket.io developers themselves and cannot be used as a custom method name. It already has functionality associated to it that we can not "easily" overwrite.
ClearChat: Simple method that clears the chat history from the server. Lets you reset chat remotely (without needing to restart server).
Along with the socket functions, we also will need a helper function to send chatRoomData to all clients after a message is added to the chatroom. This function will be called sendUpdatedChatRoomData.
Here is the code for all the methods described above (I will break each method down individually a bit later for clarity). All of these methods are housed within the io.on('connection',... function:
io.on('connection', (client) => {

  console.log("New client connected");

  //Client Sent a message
  client.on("SendMessage", (messageData) => {
    chatRoomData.push(messageData)
    sendUpdatedChatRoomData(client)
  })

  //Client entered The chat Room
  client.on("UserEnteredRoom", (userData) => {
    var enteredRoomMessage = {message: `${userData.username} has entered the chat`, username: "", userID: 0, timeStamp: null}
    chatRoomData.push(enteredRoomMessage)
    sendUpdatedChatRoomData(client)
    connectedClients[client.id] = userData

  })

  //Creating identity for new connected user
  client.on("CreateUserData", () => {
    let userID = uuid();
    let username = uniqueNamesGenerator({ dictionaries: [adjectives, names] });
    var userData = {userID: userID, username: username}
    client.emit("SetUserData", userData)
  })


  //Player Disconnecting from chat room...
  client.on('disconnecting', (data) => {
    console.log("Client disconnecting...");

    if(connectedClients[client.id]){
      var leftRoomMessage = {message: `${connectedClients[client.id].username} has left the chat`, username: "", userID: 0, timeStamp: null}
      chatRoomData.push(leftRoomMessage)
      sendUpdatedChatRoomData(client)
      delete connectedClients[client.id]
    }

  });

  //Clearing Chat room data from server
  client.on('ClearChat', () => {
    chatRoomData=[]
    console.log(chatRoomData)
    sendUpdatedChatRoomData(client)
  })

})

//Sending update chat room data to all connected clients
function sendUpdatedChatRoomData(client){
  client.emit("RetrieveChatRoomData", chatRoomData)
  client.broadcast.emit("RetrieveChatRoomData", chatRoomData)
}
Before I breakdown the above code I wanted to explain some base functionality that socket provides for communicating between the client and the server.
client.on('Method Name', (dataSent) => {
  //some code that uses dataSent
})
client.on is a socket listener function. Essentially what it does is listens for when the client sends a message or data to the server. The client calls the method by name, Method Name, and can send data, dataSent, to the method. The server can then handle that data.
client.emit('MethodName', dataSent)
client.emit is a socket messaging function. In particular, it messages one specific client application using the method name, 'MethodName', and can optionally send some type of data object, dataSent. What's important to note is that this only messages the specific client that the server is directly referencing. NOTE: This may be confusing at first, but as you use socket, it will make more sense.
client.broadcast.emit('MethodName', dataSent)
client.broadcast.emit is a socket messaging function as well but it messages all clients connected to the socket server, excluding client that initiated the request. This is particularly useful when you want to send a message to all other clients from one specific client.
So now that we understand some of the basic functionality of socket, let's break down some of our Node.js socket code.
client.on("SendMessage", (messageData) => {
    chatRoomData.push(messageData)
    sendUpdatedChatRoomData(client)
})
The SendMessage socket method will be the method our client will use when sending a chat message. Once the server receives the message, it adds the message data to the chatRoomData and then calls our helper function sendUpdatedChatRoomData to send the updated chatRoomData to all clients connected to socket server.
client.on("UserEnteredRoom", (userData) => {
    var enteredRoomMessage = {message: `${userData.username} has entered the chat`, username: "", userID: 0, timeStamp: null}
    chatRoomData.push(enteredRoomMessage)
    sendUpdatedChatRoomData(client)
    connectedClients[client.id] = userData
})
The UserEnteredRoom socket method notifies the chat when a new user has entered the chat room. It just adds a generic message with the user's username to the chatRoomData to inform other clients in the chat room of the user's entrance. It also, sends empty data in specified fields as it is just a notification message. We also add their identity to the connectedClients object using their socket auto-generated client ID.
client.on("CreateUserData", () => {
    let userID = uuid();
    let username = uniqueNamesGenerator({ dictionaries: [adjectives, names] });
    var userData = {userID: userID, username: username}
    client.emit("SetUserData", userData)
  })
The CreateUserData socket method is used to create a username and userID for a new user to the chat. It uses the uniqueNameGenerator and uuid function to create a random username and userID for a new user. Once the new user identity is created, we send back the information to the client and the client then calls the UserEnteredRoom socket method to notify chat room they have entered.
client.on('disconnecting', () => {
    console.log("Client disconnecting...");

    if(connectedClients[client.id]){
      var leftRoomMessage = {message: `${connectedClients[client.id].username} has left the chat`, username: "", userID: 0, timeStamp: null}
      chatRoomData.push(leftRoomMessage)
      sendUpdatedChatRoomData(client)
      delete connectedClients[client.id]
    }

})
The disconnecting socket method is a reserved method that is given to us for for "free" by socket.io. It just lets us know when a particular socket client is disconnecting from our server. We use this to notify the chat room when a user has left. We use their client ID that is auto-generated by socket to identify exactly which user is disconnecting and to remove them from the connectedClient object.
client.on('ClearChat', () => {
    chatRoomData=[]
    console.log(chatRoomData)
    sendUpdatedChatRoomData(client)
})
The ClearChat socket method does what the name infers. It is just a convenience method for clearing the chat. This way you don't have to restart the Node server to clear the chat.
function sendUpdatedChatRoomData(client){
  client.emit("RetrieveChatRoomData", chatRoomData)
  client.broadcast.emit("RetrieveChatRoomData", chatRoomData)
}
Finally, we have have our sendUpdatedChatRoomData helper function. Its only purpose is to make sure all clients receive the most updated chatRoomData when a new message is added to the chat. It uses the emit and broadcast functionality given to us by socket.
And that's it. For your convenience, here is the full finished code for the NodeJs Socket server:
var express = require("express");
var app = express();
var bodyParser = require("body-parser");
var path = require("path")
var uuid = require('uuid-random');

const { uniqueNamesGenerator, adjectives, colors, animals, names } = require('unique-names-generator');

// Running our server on port 3080
var PORT  = process.env.PORT || 3080

var server = app.listen(PORT, function() {
  var host = server.address().address;
  var port = server.address().port;
  console.log('Listening at http://%s:%s', 'localhost/', port);
});

app.use(bodyParser.json());

app.use(function(req, res, next) {
  res.header("Access-Control-Allow-Origin", "*");
  res.header("Access-Control-Allow-Headers", "Origin, X-Requested-With, Content-Type, Accept");
  next();
});

var io = require('socket.io')(server);

var chatRoomData = []
var connectedClients = {}

io.on('connection', (client) => {

  console.log("New client connected");

  //Client requests current server state
  client.on("SendMessage", (messageData) => {
    chatRoomData.push(messageData)
    sendUpdatedChatRoomData(client)
  })

  client.on("UserEnteredRoom", (userData) => {
    var enteredRoomMessage = {message: `${userData.username} has entered the chat`, username: "", userID: 0, timeStamp: null}
    chatRoomData.push(enteredRoomMessage)
    sendUpdatedChatRoomData(client)
    connectedClients[client.id] = userData

  })

  client.on("CreateUserData", () => {
    let userID = uuid();
    let username = uniqueNamesGenerator({ dictionaries: [adjectives, names] });
    var userData = {userID: userID, username: username}
    client.emit("SetUserData", userData)
  })


  //Player Disconnecting...
  client.on('disconnecting', (data) => {
    console.log("Client disconnecting...");

    if(connectedClients[client.id]){
      var leftRoomMessage = {message: `${connectedClients[client.id].username} has left the chat`, username: "", userID: 0, timeStamp: null}
      chatRoomData.push(leftRoomMessage)
      sendUpdatedChatRoomData(client)
      delete connectedClients[client.id]
    }

  });

  client.on('ClearChat', () => {
    chatRoomData=[]
    console.log(chatRoomData)
    sendUpdatedChatRoomData(client)
  })

})

function sendUpdatedChatRoomData(client){
  client.emit("RetrieveChatRoomData", chatRoomData)
  client.broadcast.emit("RetrieveChatRoomData", chatRoomData)
}
Now that we have all the code we need for our Socket NodeJS server, it's time to get our chat server up in the cloud so it can be used remotely and will always be available.
Deploying your Socket NodeJS Server to the Cloud
So in order to have a free way to easily deploy our application to the cloud, we will be using an IBM Cloud Lite account.
If you do not have IBM Cloud Lite account, you can quickly sign-up for free access to cloud resources for hosting your application in the cloud. Signup using this link: IBM Cloud Signup Link.
Once you are signed up we will be pushing our application to the cloud using IBM Cloud CLI in our terminal. If you do not have the IBM Cloud CLI, you can download the latest version here: IBM Cloud CLI.
NOTE: If you are interested on how to do this through the IBM Cloud dashboard, you can check out my blog on deploying a React application to the Cloud for general walkthrough of how that works: Deploying ReactJS to the Cloud.
First step, make sure you are still in a terminal window and that you are still in the simple-node-chat-server directory.
While in the directory, log into your IBM Cloud account using this command:
ibmcloud login
Enter you username and password and you should be presented with a screen like this:


![]()
Once you have logged into IBM Cloud, we need to set our IBM cloud target to Cloud Foundry as we will be using the Cloud Foundry framework to host our application. If you'd like to learn more about Cloud Foundry, check out this link: Cloud Foundry. Type this command to target Cloud Foundry:
ibmcloud target --cf
If it was successful, you should see something like this:

![]()
Right before we deploy our server to the cloud, we need to make some minor updates to our code.
In our simple-node-chat-server directory open the file named "manifest.yml"
In the file you should see this:
applications:
  - name: Simple Node Chat Server
memory: 64M
routes:
  - route: simple-node-chat-server-<your-intials>.<server-closest-to-you>.cf.appdomain.cloud
Replace with your initials and with a the server closest to you. Because you may not know what are possible server names, here is a list. Choose a server that you believe may be closest to you. And if you want to view this list yourself you can enter the command listed below:
ibmcloud regions

//Output
Name       Display name
au-syd     Sydney
in-che     Chennai
jp-osa     Osaka
jp-tok     Tokyo
kr-seo     Seoul
eu-de      Frankfurt
eu-gb      London
ca-tor     Toronto
us-south   Dallas
us-east    Washington DC
br-sao     Sao Paulo
For example, this was my updated manifest.yml(NOTE: Please do not use the same route name as displayed below. This will likely cause an error saying route is already taken when you attempt to push to IBM Cloud):
applications:
  - name: Simple Node Chat Server
memory: 64M
routes:
  - route: simple-node-chat-server-bsh.us-south.cf.appdomain.cloud
Once you have updated your manifest.yml, you only have one more step: Deploying your NodeJS application into the Cloud.
In the same terminal window you logged into IBM Cloud with, enter this command:
ibmcloud cf push
This will initiate the process of deploying your NodeJS application into the cloud. It in general takes a few minutes to deploy this code.
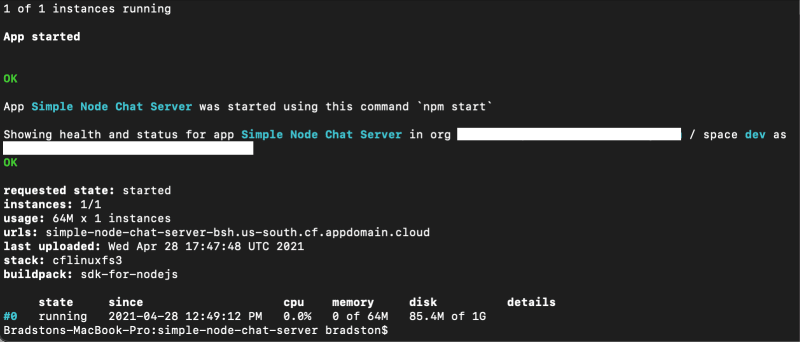
When the the application has been successfully deployed, you should see something like this in your terminal window:
Go to a browser window and insert the route value you entered into the manifest.yml. In my case that would be
simple-node-chat-server-bsh.us-south.cf.appdomain.cloud
Since there is nothing to display from our server, you should be presented with a simple message that looks something like this which means the code is running correctly:

![]()
If you do not see this page (or some other type of message), you may need to check that you code matches the code I shared above and feel free to check the actual application status and error log by visiting the IBM Cloud Resource list and finding your application by its name.
Now that we have the Server portion of the chat room up and running, our next step will be to deploy the front end React portion of the application to actually start chatting.
Check out Part 2 of this blog here: part 2
==== FOLLOW ME ON SOCIAL MEDIA ====
Twitter: Bradston Dev
Dev.to: @bradstondev
Youtube: Bradston YT


Top comments (0)